Flutter の Provider を公式の説明を読んで爆速で理解する
Flutter の Provider を公式の説明を読んで爆速で理解する

Overview
Flutter の Provider を爆速で理解するために公式の説明を読んで整理します。実は3年前にも note に「FlutterにおけるState management」という記事を書いて全く同じことをやっていましたが、当時はその後が続いていませんでした。反省も兼ねて、今回は必要最小限に爆速でまとめます。
なぜRiverpodでなくProviderか?
最近は Riverpod の方が人気のようで、RiverpodはProviderの上位互換だという話をよく聞きます。ただ、未だに公式の「List of state management approaches」で一番上に来ているのはProviderですし、「Casual Games Toolkit」を始め既存の資産(ソースコード)はまだまだProviderが多い印象です。まずはProviderを手に馴染ませて、必要性を理解できたらRiverpodに置き換えれば良いかと思っています。思想も似ているようですし。
公式の説明を読んで理解する
以下のページを読みます。
https://docs.flutter.dev/data-and-backend/state-mgmt/simple
宣言的UI
Webフロントエンド的に理解すると、要するにjQueryじゃなくてReact的な書き方のことを指すようです。アプリの状態が変化するとUIも再描画される。WidgetにsetTextなんてことはやらない。
When the state of your app changes (for example, the user flips a switch in the settings screen), you change the state, and that triggers a redraw of the user interface. There is no imperative changing of the UI itself (like
widget.setText)—you change the state, and the UI rebuilds from scratch.
https://docs.flutter.dev/data-and-backend/state-mgmt/declarative
ephemeral state と app state の違い
So a more useful definition of state is “whatever data you need in order to rebuild your UI at any moment in time”
stateとは「UIを再構築するために必要なデータ」を指す。
Ephemeral state
Ephemeral state (sometimes called UI state or local state) is the state you can neatly contain in a single widget.
This is, intentionally, a vague definition, so here are a few examples.
- current page in a
PageView- current progress of a complex animation
- current selected tab in a
BottomNavigationBar
Ephemeral stateは、現在のページや選択されたタブといった状態を指し、こういったStateには state management を使う必要がなく、StatefulWidgetを使えば良い。以下はBottomNavigationBarの実装例で、StatefulWidgetを使っている。
class MyHomepage extends StatefulWidget {
  const MyHomepage({super.key});

  @override
  State<MyHomepage> createState() => _MyHomepageState();
}

class _MyHomepageState extends State<MyHomepage> {
  int _index = 0;

  @override
  Widget build(BuildContext context) {
    return BottomNavigationBar(
      currentIndex: _index,
      onTap: (newIndex) {
        setState(() {
          _index = newIndex;
        });
      },
      // ... items ...
    );
  }
}
App state
State that is not ephemeral, that you want to share across many parts of your app, and that you want to keep between user sessions, is what we call application state (sometimes also called shared state).
Examples of application state:
- User preferences
- Login info
- Notifications in a social networking app
- The shopping cart in an e-commerce app
- Read/unread state of articles in a news app
アプリ内の色んな場所やセッションで必要になる状態が App state。ログイン情報やショッピングカートなど。この App state を管理する方法の一つが Provider。
Provider
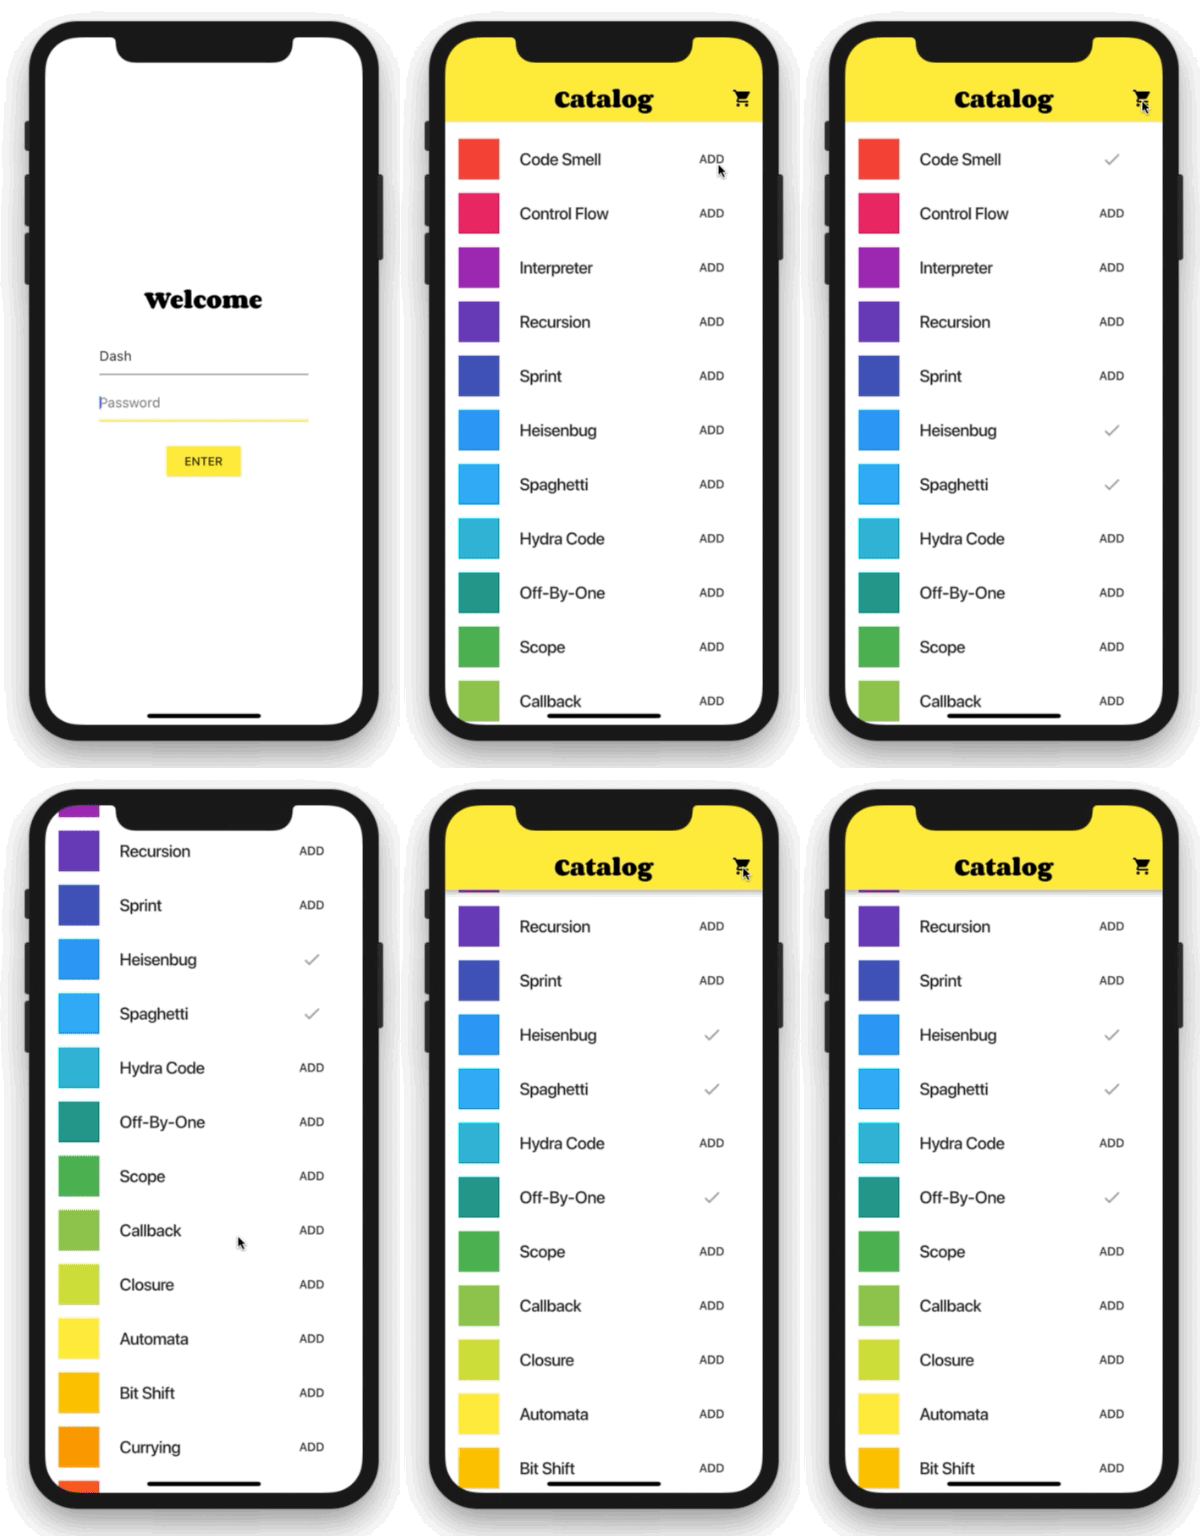
以下にショッピングカートの実装例について説明があります。gifを見てどんな機能なのか理解します。

https://docs.flutter.dev/data-and-backend/state-mgmt/simple
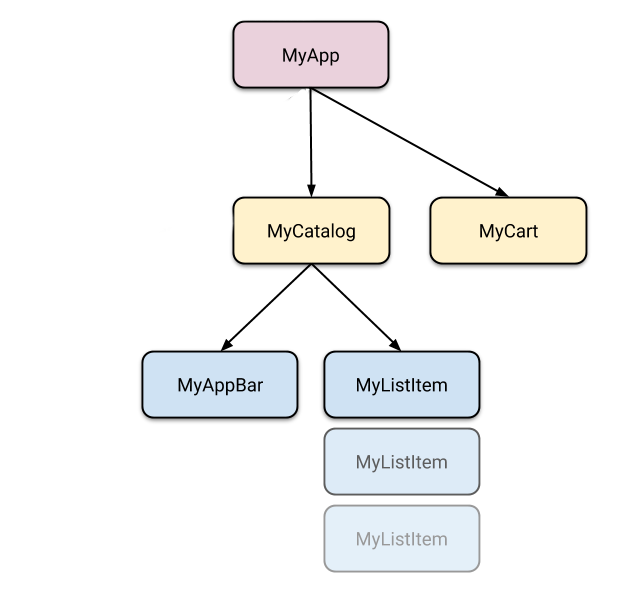
Widgetツリーはこんな感じです。MycatalogのMyLitItemの「Add」ボタンをタップしたらMyCartのStateが更新される、という点が肝になっています。

ChangeNotifier
ChangeNotifierというクラスを継承したCartModelを作成します。notifyListeners()から明らかなように、CartModelに変更が加わったらリスナーに知らせています。ちなみにChangeNotifierはProviderではなくFlutter SDKのクラスとのことです。
class CartModel extends ChangeNotifier {
  /// Internal, private state of the cart.
  final List<Item> _items = [];

  /// An unmodifiable view of the items in the cart.
  UnmodifiableListView<Item> get items => UnmodifiableListView(_items);

  /// The current total price of all items (assuming all items cost $42).
  int get totalPrice => _items.length * 42;

  /// Adds [item] to cart. This and [removeAll] are the only ways to modify the
  /// cart from the outside.
  void add(Item item) {
    _items.add(item);
    // This call tells the widgets that are listening to this model to rebuild.
    notifyListeners();
  }

  /// Removes all items from the cart.
  void removeAll() {
    _items.clear();
    // This call tells the widgets that are listening to this model to rebuild.
    notifyListeners();
  }
}
ChangeNotifierProvider
ChangeNotifierのインスタンスを子孫に提供するwidgetです。ReduxのProviderやReactContextと同じという理解です。一番上(アプリのルート)に置いておけば良いかなと思いましたが、スコープは必要最小限に絞った方が良いようです。
void main() {
  runApp(
    ChangeNotifierProvider(
      create: (context) => CartModel(),
      child: const MyApp(),
    ),
  );
}
Consumer
ChangeNotifierを継承したCartModelの変更がnotifyListeners()で通知されますが、その通知をChangeNotifierProviderを通してsubscribeするwidgetがConsumer widgetのようです。KafkaやPulsarといったPub/Subで使われるConsumerと同じ意味ですね。
Consumerも出来る限り深いところで定義することで無駄なUIの再構築を避けられるとのことです。確かに当然ですね。
// DON'T DO THIS
return Consumer<CartModel>(
  builder: (context, cart, child) {
    return HumongousWidget(
      // ...
      child: AnotherMonstrousWidget(
        // ...
        child: Text('Total price: ${cart.totalPrice}'),
      ),
    );
  },
);
// DO THIS
return HumongousWidget(
// ...
child: AnotherMonstrousWidget(
// ...
child: Consumer<CartModel>(
builder: (context, cart, child) {
return Text('Total price: ${cart.totalPrice}');
},
),
),
);Provider.of
例えば「ボタンが押されたらカート内のアイテムを全て取り除く」といった場合、CartModelの中のデータを表示する必要はないですが、CartModel自体にはアクセスする必要があります。こういった場合はConsumer widgetとして実装する必要はなく、単にCartModelのメソッド(removeAll())にアクセスできれば良いです。こういった場合にProvider.ofが使えます。
Provider.of<CartModel>(context, listen: false).removeAll();サンプルのソースコードを読んで理解する
class MyApp extends StatelessWidget {
  const MyApp({super.key});

  @override
  Widget build(BuildContext context) {
    // Using MultiProvider is convenient when providing multiple objects.
    return MultiProvider(
      providers: [
        // In this sample app, CatalogModel never changes, so a simple Provider
        // is sufficient.
        Provider(create: (context) => CatalogModel()),
        // CartModel is implemented as a ChangeNotifier, which calls for the use
        // of ChangeNotifierProvider. Moreover, CartModel depends
        // on CatalogModel, so a ProxyProvider is needed.
        ChangeNotifierProxyProvider<CatalogModel, CartModel>(
          create: (context) => CartModel(),
          update: (context, catalog, cart) {
            if (cart == null) throw ArgumentError.notNull('cart');
            cart.catalog = catalog;
            return cart;
          },
        ),
      ],
      child: MaterialApp.router(
        title: 'Provider Demo',
        theme: appTheme,
        routerConfig: router(),
      ),
    );
  }
}ここで ChangeNotifierProviderが使われてるのかなと思いきや、ChangeNotifierProxyProvider なるものが使われていました。
CartModelのStateに何らか変更が起きた場合に上記の update に入ります。CartModelのフィールドにCatalogModelがある(= CartModelはCatalogModelに依存している)場合には ChangeNotifierProxyProvider が必要とのことです。
...
 return TextButton(
      onPressed: isInCart
          ? null
          : () {
              // If the item is not in cart, we let the user add it.
              // We are using context.read() here because the callback
              // is executed whenever the user taps the button. In other
              // words, it is executed outside the build method.
              var cart = context.read<CartModel>();
              cart.add(item);
            },
...追加自体はここで実装されています。特筆すべき点はないですね。
次はProviderを使ってみんな大好きTODO Listを作成しながら手に馴染ませようと思います。
